Thursday, February 28, 2013

Metallic Nails


This metallic edgy nail look is easy to make. You would need only two colors: a metallic silver and black. You can bring the picture with you to the person who does your nails. Let's get it started!
  1. Apply a base coat
  2. Then paint your nails metallic silver
  3. Wait 3-5 min
  4. Then with a thin brush draw a black downward looking triangle on your thumbs
  5. From the tip  of that triangle draw a straight line all the way to your cuticle
  6. You can do this design to all of your nails if you want
  7. Seal your nails with a topcoat
  8. Enjoy:)
xoxo,

Toscha

Tuesday, February 26, 2013

Nike Nail Design


This sporty nail tutorial is going to be extremely easy. I was inspired by one of my favorite sports brand, Nike. For this nail look you will need a grey nail polish and orange polish to create the Nike swoosh logo. Remember, you can always show the picture to the person who does your nails. Let's begin the tutorial!
  1. Apply a base coat
  2. Then paint your nails grey
  3. Wait 3-5 min
  4. Next with a thin brush draw the Nike orange swoosh logo on your thumb nail. (First, make a smaller checkmark then make a little bigger checkmark under the small one, so the ends of the big checkmark are connected to the ends of the smaller one. It should look like a big empty checkmark. Fill in the checkmark with orange polish)
  5. Then draw the orange logo on your ring finger as well
  6. You can look at the picture to get the idea of how thin or thick the logo should look
  7. Let your nails dry completely
  8. Seal your nails with a topcoat
  9. Enjoy:)

xoxo,
Toscha

Sunday, February 24, 2013

Cotton Candy Spring Look


I am ready for Spring! My inner world feels full of bright colors right now. I usually try to tone down bright colors by adding darker and calm colors to my outfit. But this time I feel like going skittles:) When you look at this outfit, your mood completely changes, don't you feel it?
For this Spring look I combined a pair of coral jeans, green silk chiffon ruffle tank top, camo print flats and a yellow sweater. Also, I added matching bracelets to bring the bright colors together. If you are feeling like me, all ready for Spring then you should start wearing bright colors. Be confident, be happy and be  bright! Have a colorful day!
Mandee coral jeans, TJmaxx top, USPA yellow top, Gap shoes
xoxo,
Toscha

Rainbow Nail Look


To create this bright Rainbow Nail Look you will need three bright colors. I chose orange, yellow and mint green. As you already see I posted 2 versions of the Rainbow Nail Look, one with black tips and the other one is plain rainbow. I personally like them both, you can choose whichever one you like. If you like the nail look with black tips then you would also need a black polish. You can always take the picture to the person who does your nails. Let's begin!

1. Apply a base coat to your nails
2.Using your regular polish brush make one wide orange line on the right side of your nail. The width of a regular polish brush should be the width of the line.Try to swipe the brush once, from bottom to top
3. Next make a yellow line in the middle of your nail
4. Then paint the final minty green line 
5. You should finish one nail first, then move on to the next one
6. Wait about 5 min when you are done painting all your nails
7. You can add thin black tips with a help of a thin brush. Just gently swipe the brush from left to right.
8. Enjoy:)
xoxo,
Toscha

Friday, February 22, 2013

Red Nails


This nail look is simple, chic and sexy. I specifically added this leopard print bow tie to demonstrate how well they complement each other. If you want to rock your red nails you should wear leopard print accessories. It can be a leopard print bracelet, purse or a watch.
This principle can be applied to your look as well. For example, you can wear red pants with a leopard print blazer or vice versa. ) So, if you feel like experimenting with these two eye catching colors then all I have to say is, Go For It!
 Just to give you an idea...

I got this picture from http://madamelolo.com/shopping/obsession-of-the-month/
xoxo,
Toscha

Wednesday, February 20, 2013

Purple Nail Design


When I created  this nail look, the first word that came into my mind was "warm." Since it has little gold sparkles on lavender purple color, we can call it "evening." So, here is Warm Evening nail look:) You will need a glossy lavender purple polish, gold glitter polish and a black color to make thin lines. Or you can show the picture to the person who does your nails. Let's begin!
  1. Apply a base coat
  2. Then paint your nails lavender purple
  3. Wait 3-5 min
  4. Next with a thin brush make wide gold lines in the center of your nails. If your brush is too thin you can make two connected thin lines which will create one wider line.
  5. Then, with a help of a thin brush or a toothpick align the gold lines with a black color from both sides
  6. You can look at the picture to get the idea of how thin or thick the lines should look
  7. Let your nails dry completely
  8. Seal your nails with a topcoat
  9. Enjoy:)
xoxo,

Toscha

Tuesday, February 19, 2013

Afraid to Wear Neon Colors?


Are you afraid of wearing neon colors? A lot of people don't feel comfortable wearing bright neon colors for different reasons. Some think it's too bright, while others think its age inappropriate. I used to associate neon colors with extremely cheap and low-quality fabrics, but not anymore.
In fact, I love neon colors. Now, the fashion industry is bringing back neon colors on a high-quality level. There are old trusted famous brands like Coach, Chanel and Prada that make clothing, accessories and even cosmetics in neon colors.
So, my suggestion is go for it! Neon colors are bright, refreshing and youthful, but you should be careful of overdoing it! Start slowly by adding one neon colored item to your wardrobe.
You can begin with a bright pair of shoes or a handbag. If that seems like a big change, then you can paint your nails pink neon, or any other color you feel comfortable with. And if that still seems too much, then you should get a fashionable neon phone case.
Once you become friends with bright neon colors, you might even become obsessed with them. Try not to go completely head-to-toe neon. Especially, when you are new to these colors. You might end up looking like a fake Barbie doll:) Other then that, there are no restrictions. Enjoy:-)
P.S.  I really liked this video on how to wear neon colors. Here is the link:

xoxo,
Toscha

Sunday, February 17, 2013

Asparagus Green Nail Design


Looks nice, huh? Most importantly, it is easy to make. All you need is 2 colors:  a glossy asparagus green and a yellow color for shifted crosses. Let's begin!
  1. Apply a base coat
  2. Then paint your nails asparagus glossy green
  3. Wait 3-5 min
  4. Then with a help of a striper (thin brush) make yellow horitontal lines closer to the cuticles of your nails
  5. Then make vertical lines little shifted from the middle to the left
  6. I added a red shifted cross on a thumb nail. It's optional.
  7. Let your nails dry completely
  8. Seal your nails with a topcoat
  9. Enjoy:)
xoxo,

Toscha

Thursday, February 14, 2013

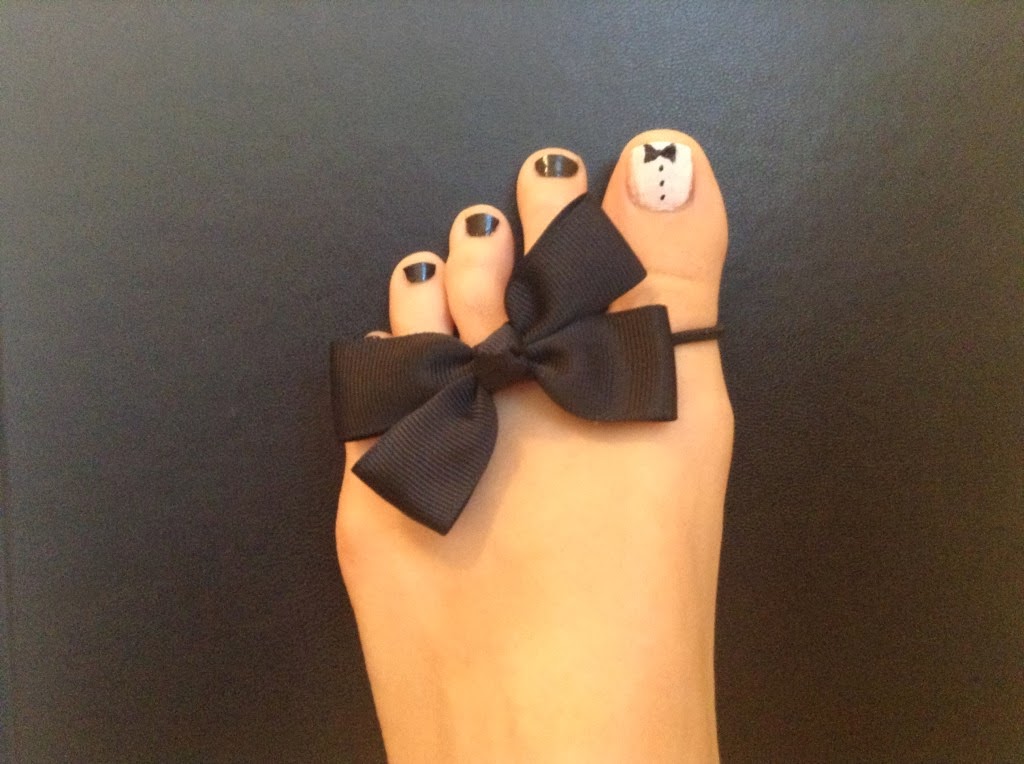
Black&White Nail Look


For this awesome pedi look you need a black nail polish and a white nail polish. And, of course, a base coat and a topcoat. or take the picture to the person who does your nails. 
  1. Apply a base coat to your toenails
  2. Paint your toenails black except your big toe nail
  3. Paint your big toe nail white
  4. Let them dry for 3-5 min
  5. Next, draw a black bow tie on your big toe's tip
  6. Then carefully make 3 vertical dots with a striper or a toothpick
  7. Finally, apply a topcoat to make the color look glossy and last longer
  8. Enjoy:)
xoxo,

Toscha

Wednesday, February 13, 2013

Cracked Mint Turquoise Nails


I was so proud of myself when I created this summery nail look. This is my favorite so far. I called it Cracked Minty Turquoise because it looks like a turquoise stone, but the real turquoise is blueish so that is why I indicated that it's mint. For this nail look you will need any matte mint nail polish and a black nail polish to create the cracks. Or take the picture to the person who does your nails. Let's begin!
  1. Apply a base coat
  2. Then paint your nails mint green
  3. Start drawing a black cracked lines with a thin nail art brush.
  4. You need to add a micro shake to your hand while drawing the lines. So the lines look shaky and uneven which gives this cracked look.
  5. You can look at the picture and copy the lines or you can create your own cracked lines
  6. Let your nails dry completely
  7. Seal your nails with a topcoat
  8. Enjoy:)
xoxo,

Toscha

Tuesday, February 12, 2013

Valentine's Day Pedi


This pedi look is easy and pretty as you already see. Do you even need a tutorial for this one??? Just kidding... Anyways, for this cute pedi you will need a base coat, a black nail polish and a red polish. Or take the picture to the person who does your nails. So, let's get it started!
  1. Apply a base coat to your toenails
  2. Paint your toenails black except your big toe nail
  3. Paint your big toe nail red
  4. Let them dry for 3-5 min
  5. Then carefully draw black heart shapes on your big toe nail using a thin brush
  6. Next draw a thin black tip on your big toe nail
  7. Finally, apply a topcoat to seal the nails and make the color last longer
  8. Enjoy:)
xoxo,

Toscha

Monday, February 11, 2013

Valentine's Day Easy Nail Art


This is how I began my blogging journey. I started uploading simple nail designs on TheHappyHnadsAndFeet.com. And I think this was the first nail design that I've ever done. In my later posts you'll see how I modified the pictures by adding step-by-step pics:) This Valentine's Day nail look is easy to make. You can wear it for Valentine's Day or any other day. Things you need: pink nail polish, silver nail polish and a thin nail polish brush to create the silver tips. Or take the picture to the person who does your nails:)
1. Apply the base color first (it's a clear nail polish that is meant to protect your nails)
2. Paint your nails pink
3. Then with a help of a thin brush create thin silver tips as shown in the picture (gently swipe the brush from left to right)
4. Draw three empty diagonal hearts with a black nail polish striper. Then fill in the hearts with the silver polish. Wait until your nails completely dry, then apply a coat of clear polish to make the color last longer.
xoxo,
Toscha